The post How to Install WordPress on Ubuntu with Nginx, MariaDB and PHP-FPM appeared first on PixelsPress.
]]>Prerequisites
- Have an Ubuntu 19.10 x64 instance.
- Logged in as a root with sudo privileges.
- Installed Nginx, MariaDB and PHP-FPM
Note: For demonstration purposes, we’re going to set up one domain on our Nginx server. The domain name we’ll use in this guide is yourdomain.com.
To get started with the installation of WordPress, follow the steps below:
Step 1: Create WordPress Database
To logon to MariaDB database server, run the following commands:
sudo mysql -u root -pThen create a database called yourname_live
CREATE DATABASE yourname_live;Now create a database user called yourname_live_user with a new password
CREATE USER 'yourname_live_user'@'localhost' IDENTIFIED BY 'your_password_here';And grant the user full access to the database.
GRANT ALL ON yourname_live.* TO 'yourname_live_user'@'localhost' IDENTIFIED BY 'your_password_here' WITH GRANT OPTION;Finally, save your changes and exit.
FLUSH PRIVILEGES;
EXIT;
Step 2: Download WordPress Latest Release
To get WordPress latest release, go to its official download page and get it from there. The following link is from where we can find latest WordPress archive versions.
cd /tmp
wget https://wordpress.org/latest.tar.gz
tar -xvzf latest.tar.gz
sudo mv wordpress /var/www/html/yourdomain.com
Now run the commands below to set the correct permissions for WordPress root directory and give Nginx control
sudo chown -R www-data:www-data /var/www/html/yourdomain.com/
sudo chmod -R 755 /var/www/html/yourdomain.com/
Step 3: Configure Nginx
Finally, configure Nginx site configuration file for WordPress. This file will control how users access WordPress content. Run the following commands to create a new configuration file called yourdomain.com.conf
sudo nano /etc/nginx/sites-available/yourdomain.com.confCopy and paste the following content into ‘yourdomain.com.conf’ file and save it. Replace the highlighted line with your own domain name and directory root location.
#yourdomain.com configuration
server {
    charset utf-8;

    # set max upload size
    client_max_body_size 2G;
    fastcgi_buffers 64 4K;

    listen 80;  # Listen for ipv4
    listen [::]:80; # Listen for ipv6
    server_name yourdomain.com www.yourdomain.com;

    root /var/www/html/yourdomain.com;
    index index.php index.html index.htm;

    location / {
        try_files $uri $uri/ /index.php?$args;
    }

    location ~ \.php$ {
        include snippets/fastcgi-php.conf;
        fastcgi_pass unix:/var/run/php/php7.3-fpm.sock;
        fastcgi_param SCRIPT_FILENAME $document_root$fastcgi_script_name;
        include fastcgi_params;
    }
}
Save the file and exit.
Step 4: Enable the WordPress
After configuring the Virtual Host above, enable it by running the commands below
sudo ln -s /etc/nginx/sites-available/yourdomain.com.conf /etc/nginx/sites-enabled/
sudo systemctl restart nginx
Then open your browser and browse to the server domain name. You should see WordPress setup wizard to complete. Please follow the wizard carefully.
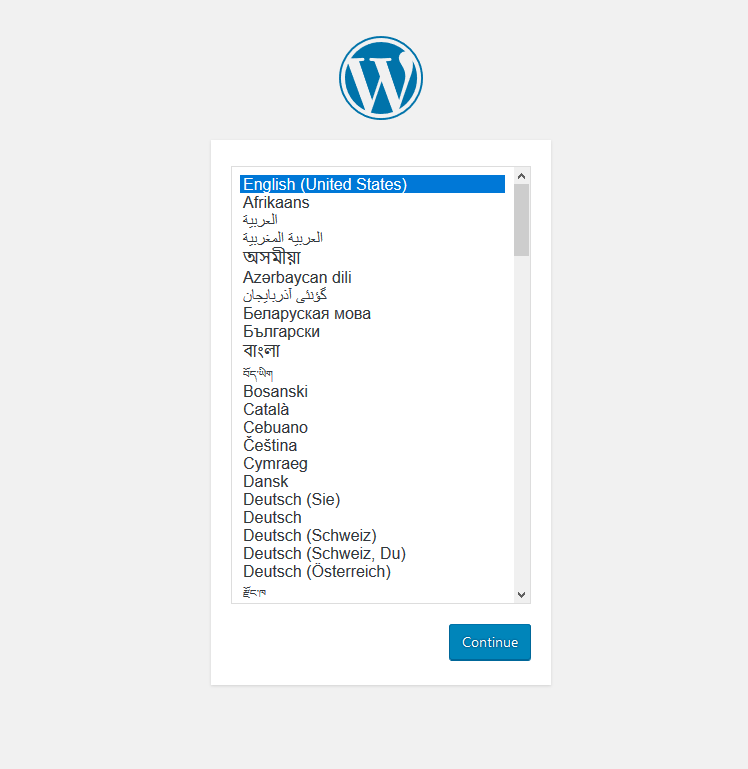
http://yourdomain.comFollow the on-screen instructions. i.e. select the installation language and click Continue.
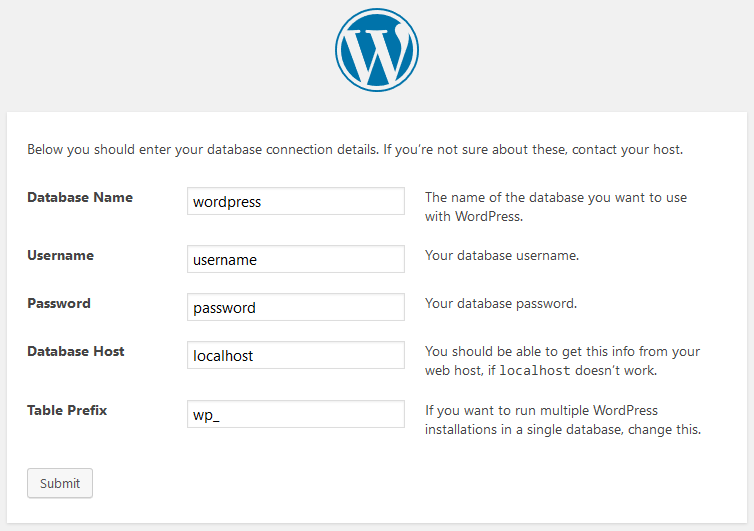
You will need to know the following
Before getting started, we need some information on the database. You will need to know the following items before proceeding.
- database_name
- database_username
- database_password
- database_host
- Table prefix (if you want to run more than one WordPress in a single database)
WordPress will going to use this information to create a wp-config.php file.

Next, you should enter your database connection details and if you’re not sure about these, contact your host.
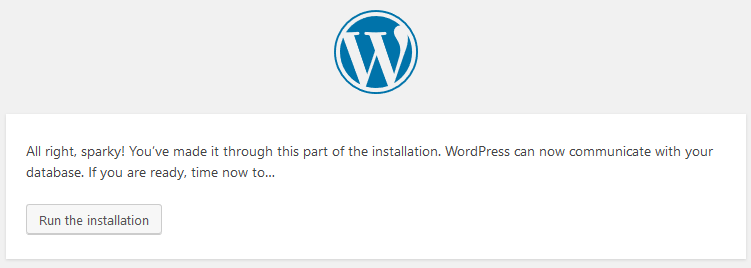
After that, click Run the installation to complete the WordPress setup.
Next, fill in the WordPress site information and then click Install WordPress
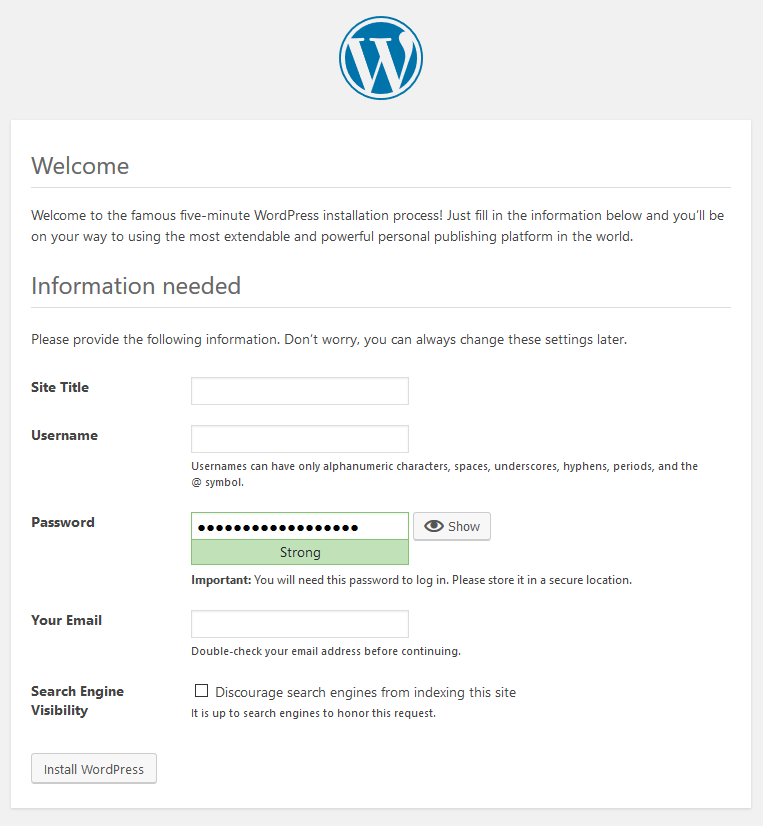
You’re done. WordPress is installed now and ready to use.
The post How to Install WordPress on Ubuntu with Nginx, MariaDB and PHP-FPM appeared first on PixelsPress.
]]>The post How to Install WordPress 5.2.3 on Ubuntu with Apache2, MariaDB and PHP 7.2 appeared first on PixelsPress.
]]>Prerequisites
- Have an Ubuntu 16.04 x64 / 18.04 x64 / 18.10 x64 instance.
- Logged in as a root with sudo privileges.
- Installed Apache2 HTTP Server, MariaDB and PHP 7.2
To get started with the installation of WordPress, follow the steps below:
Step 1: Create WordPress Database
To logon to MariaDB database server, run the following commands:
sudo mysql -u root -p
Then create a database called yourname_live
CREATE DATABASE yourname_live;
Now create a database user called yourname_live_user with a new password
CREATE USER 'yourname_live_user'@'localhost' IDENTIFIED BY 'your_password_here';
And grant the user full access to the database.
GRANT ALL ON yourname_live.* TO 'yourname_live_user'@'localhost' IDENTIFIED BY 'your_password_here' WITH GRANT OPTION;
Finally, save your changes and exit.
FLUSH PRIVILEGES;
EXIT;
Step 2: Download WordPress Latest Release
To get WordPress latest release, go to its official download page and get it from there. The following link is from where we can find latest WordPress archive versions.
cd /tmp
wget https://wordpress.org/latest.tar.gz
tar -xvzf latest.tar.gz
sudo mv wordpress /var/www/html/yourprojectname
Now run the commands below to set the correct permissions for WordPress root directory and give Apache2 control
sudo chown -R www-data:www-data /var/www/html/yourprojectname/
sudo chmod -R 755 /var/www/html/yourprojectname/
Step 3: Configure Apache2
Finally, configure Apahce2 site configuration file for WordPress. This file will control how users access WordPress content. Run the following commands to create a new configuration file called yourprojectname.conf
sudo nano /etc/apache2/sites-available/yourprojectname
Copy and paste the following content into ‘yourprojectname.conf’ file and save it. Replace the highlighted line with your own domain name and directory root location.
<VirtualHost *:80>
    ServerAdmin admin@example.com
    DocumentRoot /var/www/html/yourprojectname
    ServerName example.com
    ServerAlias www.example.com

    <Directory /var/www/html/yourprojectname/>
        Options FollowSymlinks
        AllowOverride All
        Require all granted
    </Directory>

    ErrorLog ${APACHE_LOG_DIR}/error.log
    CustomLog ${APACHE_LOG_DIR}/access.log combined

    <Directory /var/www/html/yourprojectname/>
        RewriteEngine on
        RewriteBase /
        RewriteCond %{REQUEST_FILENAME} !-f
        RewriteRule ^(.*) index.php [PT,L]
    </Directory>
</VirtualHost>
Save the file and exit.
Step 4: Enable the WordPress and Rewrite Module
After configuring the Virtual Host above, enable it by running the following commands
sudo a2ensite yourprojectname
sudo a2enmod rewrite
sudo systemctl restart apache2.service
Now open your browser and browse to the server domain name. You should see WordPress setup wizard to complete. Please follow the wizard carefully.
http://your_domain_name.comFollow the on-screen instructions. i.e. select the installation language and click Continue.
You will need to know the following
Before getting started, we need some information on the database. You will need to know the following items before proceeding.
- database_name
- database_username
- database_password
- database_host
- Table prefix (if you want to run more than one WordPress in a single database)
WordPress will going to use this information to create a wp-config.php file.
Next, you should enter your database connection details and if you’re not sure about these, contact your host.
After that, click Run the installation to complete the WordPress setup.
Next, fill in the WordPress site information and then click Install WordPress
You’re done. WordPress is installed now and ready to use.
The post How to Install WordPress 5.2.3 on Ubuntu with Apache2, MariaDB and PHP 7.2 appeared first on PixelsPress.
]]>The post How to Install MariaDB on Ubuntu appeared first on PixelsPress.
]]>Prerequisites
- Have an Ubuntu 16.04 x64 / 18.04 x64 / 20.04 x64 / 22.04 x64 instance.
- Logged in as a root with sudo privileges.
To get started with the installation of MariaDB, follow the steps below:
Install MariaDB on Ubuntu
To install MariaDB server, run the following commands:
sudo apt update
sudo apt install mariadb-server
After installing MariaDB, you can check the MariaDB status by using the following command:
sudo systemctl status mariadbOutput
mariadb.service - MariaDB database server
   Loaded: loaded (/lib/systemd/system/mariadb.service; enabled; vendor preset: enabled)
   Active: active (running) since Fri 2019-04-19 19:11:25 UTC; 1 day 13h ago
 Main PID: 638 (mysqld)
   Status: "Taking your SQL requests now..."
    Tasks: 28 (limit: 502)
   Memory: 80.3M
   CGroup: /system.slice/mariadb.service
           └─638 /usr/sbin/mysqld
You can check the MariaDB version with the following command:
mariadb -VYou can stop, start and enable the MariaDB when Ubuntu is rebooted with the following commands:
sudo systemctl stop mariadb.service
sudo systemctl start mariadb.service
sudo systemctl enable mariadb.service
Now use mysql_secure_installation to secure the installation of MariaDB server i.e.
sudo mysql_secure_installationThe script will prompt you to determine which actions to perform by answering the following questions.
In order to log into MariaDB to secure it, we'll need the current password for the root user. If you've just installed MariaDB, and you haven't set the root password yet, the password will be blank, so you should just press enter here.

Enter current password for root (enter for none):
OK, successfully used password, moving on...

Setting the root password ensures that nobody can log into the MariaDB root user without the proper authorization.

You already have a root password set, so you can safely answer 'n'.
Change the root password? [Y/n] n
... skipping.

Remove anonymous users? [Y/n] Y
... Success!

Disallow root login remotely? [Y/n] y
... Success!

Remove test database and access to it? [Y/n] y
- Dropping test database...
... Success!
- Removing privileges on test database...
... Success!

Reload privilege tables now? [Y/n] y
... Success!
Cleaning up...

All done! If you've completed all of the above steps, your MariaDB installation should now be secure.

Thanks for using MariaDB!
Now that MariaDB is installed, to verify whether the database server was successfully installed, run the following commands
sudo mysql -u root -ptype the root password when prompted…
Welcome to the MariaDB monitor.  Commands end with ; or \g.
Your MariaDB connection id is 190
Server version: 10.1.29-MariaDB-6ubuntu2 Ubuntu 18.10

Copyright (c) 2000, 2017, Oracle, MariaDB Corporation Ab and others.

Type 'help;' or '\h' for help. Type '\c' to clear the current input statement.

MariaDB [(none)]>
If you see a similar message as shown above, then the MariaDB was successfully installed.
Conclusion
Now you have learned how to Install MariaDB server on Ubuntu and you also know how to connect to the MariaDB server from the command line.
If you have questions feel free to leave a comment below.
The post How to Install MariaDB on Ubuntu appeared first on PixelsPress.
]]>