The post How To Create a Sudo User on Ubuntu appeared first on PixelsPress.
]]>Prerequisites
- Have an Ubuntu 16.04 x64 / 18.04 x64 / 18.10 x64 / 22.04 X64 instance.
- Logged in as a root with sudo privileges.
To get started with the creation of a new user, follow the steps below:
Logging Into Your Server via Secure Shell (SSH)
SSH into your server as the root user:
ssh root@your_server_ip_address
Create a Sudo User on Ubuntu
Create a new user account with the adduser command and use a strong password.
adduser mohsin
and the output will be
Adding user `mohsin' ...
Adding new group `mohsin' (1001) ...
Adding new user `mohsin' (1001) with group `mohsin' ...
Creating home directory `/home/mohsin' ...
Copying files from `/etc/skel' ...
New password:
Retype new password:
passwd: password updated successfully
After that, you will be asked to enter values for the user information e.g. Full Name, Room Number etc, or press ENTER to leave those fields blank.
Changing the user information for mohsin
Enter the new value, or press ENTER for the default
        Full Name []: Mohsin Rafique
        Room Number []:
        Work Phone []:
        Home Phone []:
        Other []:
Is the information correct? [Y/n] Y
Add the User to the Sudo Group
Use the following command to add the user to the sudo group:
adduser mohsin sudo
and the output will be
Adding user `mohsin' to group `sudo' ...
Adding user mohsin to group sudo
Done.
Test Sudo Access
Now switch to the new user with the following command
su - mohsin
Verify with the following command:
whoami
and the output will be:
mohsin
Now test sudo access with sudo whoami, which should return root.
sudo whoami
and the output will be
[sudo] password for mohsin:
After giving the password, output will be
root
Note: Be sure to replace mohsin with the username you just added.
Conclusion
Now you have learned how to create a new user with sudo access on Ubuntu. If you have questions feel free to leave a comment below.
The post How To Create a Sudo User on Ubuntu appeared first on PixelsPress.
]]>The post How to Install Nginx on Ubuntu appeared first on PixelsPress.
]]>Prerequisites
- Have an Ubuntu 16.04 x64 / 18.04 x64 / 20.04 x64 / 22.04 x64 instance.
- Logged in as a root with sudo privileges.
To get started with the installation of Nginx, follow the steps below:
Install Nginx on Ubuntu
Before to install server, run the following commands first to update Ubuntu:
sudo apt update
sudo apt upgrade
Next, install Nginx web server with the following command:
sudo apt install nginxThis is it, Nginx is installed and it starts automatically. You can check the Nginx service status by using the following command:
sudo systemctl status nginx● nginx.service - A high performance web server and a reverse proxy server
Loaded: loaded (/lib/systemd/system/nginx.service; enabled; vendor preset: enabled)
Active: active (running) since Fri 2019-11-08 13:15:24 UTC; 7s ago
Docs: man:nginx(8)
Main PID: 23018 (nginx)
Tasks: 2 (limit: 2287)
Memory: 5.7M
CGroup: /system.slice/nginx.service
├─23018 nginx: master process /usr/sbin/nginx -g daemon on; master_process on;
└─23019 nginx: worker process
Nov 08 13:15:24 yourdomainname.com systemd[1]: Starting A high performance web server and a reverse proxy server...
Nov 08 13:15:24 yourdomainname.com systemd[1]: Started A high performance web server and a reverse proxy server.The other following commands used to stop, start and enable Nginx service.
sudo systemctl stop nginx.service
sudo systemctl start nginx.service
sudo systemctl enable nginx.service
Note: Ubuntu 22.04 uses the UFW firewall by default, which stands for “Uncomplicated Firewall.” When the firewall is enabled, it will block all incoming connections. To allow incoming connections on certain ports, you have to configure the UFW firewall.
To open ports for a Nginx web server, you have to execute the following command:
sudo ufw allow in "Nginx Full"Now to check your current firewall configuration settings, please run the following command:
sudo ufw status verboseand the output will be:
Status: active
Logging: on (low)
Default: deny (incoming), allow (outgoing), disabled (routed)
New profiles: skip

To                         Action      From
--                         ------      ----
22                         ALLOW IN    Anywhere
80,443/tcp (Nginx Full)    ALLOW IN    Anywhere
22 (v6)                    ALLOW IN    Anywhere (v6)
80,443/tcp (Nginx Full (v6)) ALLOW IN    Anywhere (v6)
Verifying the Nginx Installation in Browser
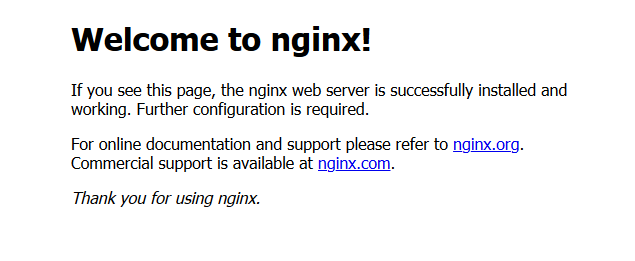
To verify that Nginx working, open your browser, write your domain name or server IP address i.e. http://YOUR_IP_OR_DOMAIN and you will see the following default Ubuntu Nginx welcome page.
Conclusion
You have learned how to install Nginx on Ubuntu server. You can repeat the steps we outlined above and install it on additional new Ubuntu servers.
If you are facing any problems, feel free to leave a comment.
The post How to Install Nginx on Ubuntu appeared first on PixelsPress.
]]>The post How to Install WordPress 5.2.3 on Ubuntu with Apache2, MariaDB and PHP 7.2 appeared first on PixelsPress.
]]>Prerequisites
- Have an Ubuntu 16.04 x64 / 18.04 x64 / 18.10 x64 instance.
- Logged in as a root with sudo privileges.
- Installed Apache2 HTTP Server, MariaDB and PHP 7.2
To get started with the installation of WordPress, follow the steps below:
Step 1: Create WordPress Database
To logon to MariaDB database server, run the following commands:
sudo mysql -u root -p
Then create a database called yourname_live
CREATE DATABASE yourname_live;
Now create a database user called yourname_live_user with a new password
CREATE USER 'yourname_live_user'@'localhost' IDENTIFIED BY 'your_password_here';
And grant the user full access to the database.
GRANT ALL ON yourname_live.* TO 'yourname_live_user'@'localhost' IDENTIFIED BY 'your_password_here' WITH GRANT OPTION;
Finally, save your changes and exit.
FLUSH PRIVILEGES;
EXIT;
Step 2: Download WordPress Latest Release
To get WordPress latest release, go to its official download page and get it from there. The following link is from where we can find latest WordPress archive versions.
cd /tmp
wget https://wordpress.org/latest.tar.gz
tar -xvzf latest.tar.gz
sudo mv wordpress /var/www/html/yourprojectname
Now run the commands below to set the correct permissions for WordPress root directory and give Apache2 control
sudo chown -R www-data:www-data /var/www/html/yourprojectname/
sudo chmod -R 755 /var/www/html/yourprojectname/
Step 3: Configure Apache2
Finally, configure Apahce2 site configuration file for WordPress. This file will control how users access WordPress content. Run the following commands to create a new configuration file called yourprojectname.conf
sudo nano /etc/apache2/sites-available/yourprojectname
Copy and paste the following content into ‘yourprojectname.conf’ file and save it. Replace the highlighted line with your own domain name and directory root location.
<VirtualHost *:80>
    ServerAdmin admin@example.com
    DocumentRoot /var/www/html/yourprojectname
    ServerName example.com
    ServerAlias www.example.com

    <Directory /var/www/html/yourprojectname/>
        Options FollowSymlinks
        AllowOverride All
        Require all granted
    </Directory>

    ErrorLog ${APACHE_LOG_DIR}/error.log
    CustomLog ${APACHE_LOG_DIR}/access.log combined

    <Directory /var/www/html/yourprojectname/>
        RewriteEngine on
        RewriteBase /
        RewriteCond %{REQUEST_FILENAME} !-f
        RewriteRule ^(.*) index.php [PT,L]
    </Directory>
</VirtualHost>
Save the file and exit.
Step 4: Enable the WordPress and Rewrite Module
After configuring the Virtual Host above, enable it by running the following commands
sudo a2ensite yourprojectname
sudo a2enmod rewrite
sudo systemctl restart apache2.service
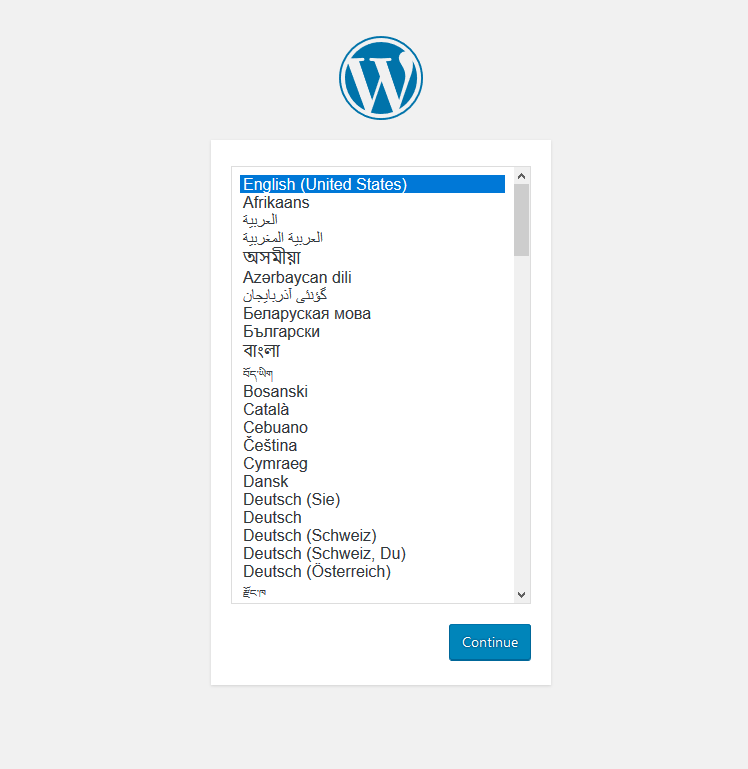
Now open your browser and browse to the server domain name. You should see WordPress setup wizard to complete. Please follow the wizard carefully.
http://your_domain_name.comFollow the on-screen instructions. i.e. select the installation language and click Continue.
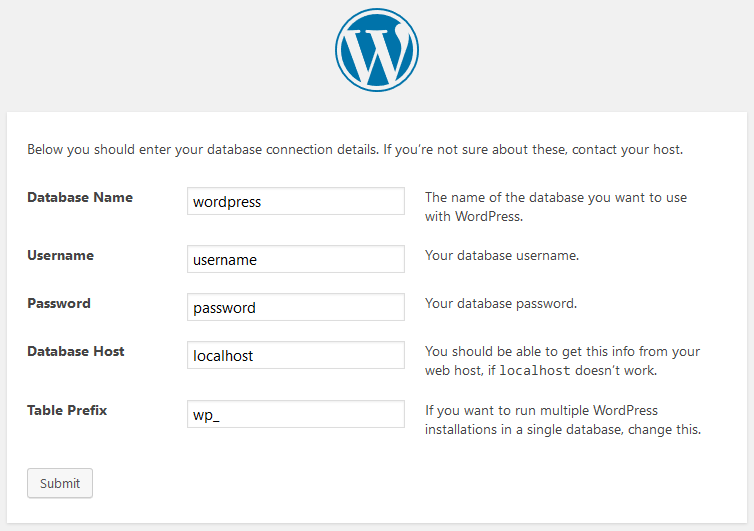
You will need to know the following
Before getting started, we need some information on the database. You will need to know the following items before proceeding.
- database_name
- database_username
- database_password
- database_host
- Table prefix (if you want to run more than one WordPress in a single database)
WordPress will going to use this information to create a wp-config.php file.

Next, you should enter your database connection details and if you’re not sure about these, contact your host.
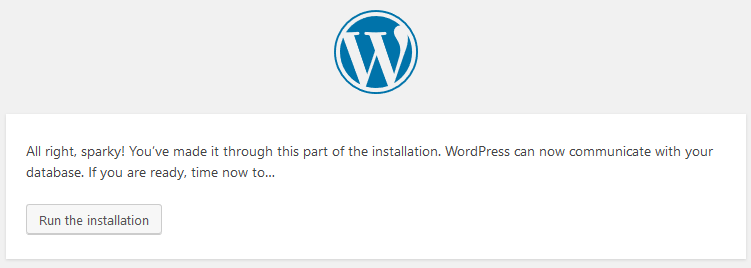
After that, click Run the installation to complete the WordPress setup.
Next, fill in the WordPress site information and then click Install WordPress
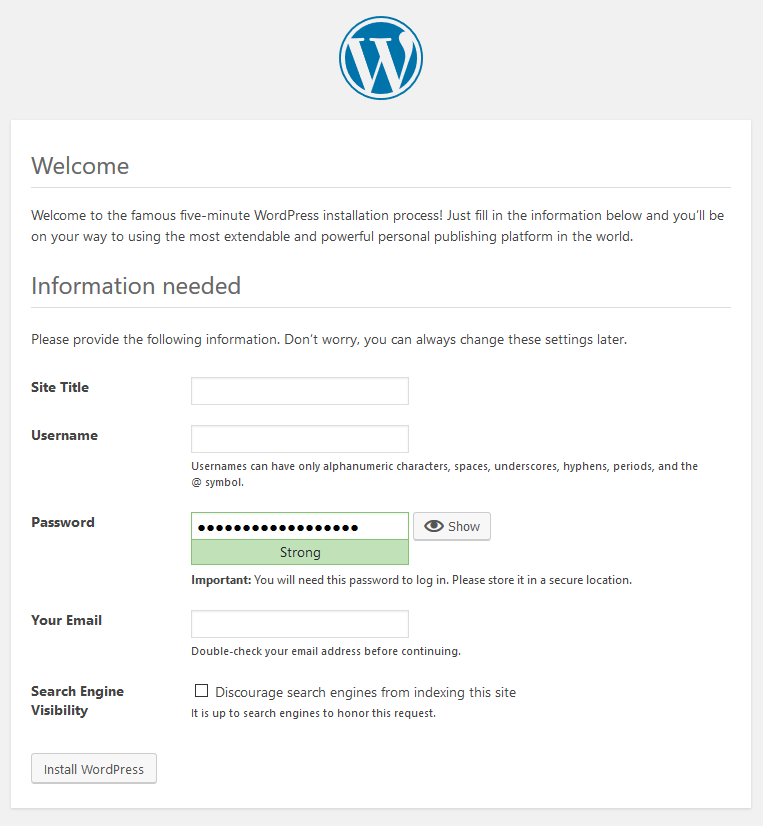
You’re done. WordPress is installed now and ready to use.
The post How to Install WordPress 5.2.3 on Ubuntu with Apache2, MariaDB and PHP 7.2 appeared first on PixelsPress.
]]>The post How to Install PHP 7.2 on Ubuntu 16.04 / 18.04 / 18.10 appeared first on PixelsPress.
]]>PHP (recursive acronym for PHP: Hypertext Preprocessor) is a widely-used open source general-purpose scripting language that is especially suited for web development and can be embedded into HTML. It is one of the most popular languages and freely available for redistribution and modifications. It can be run on almost any web server ( e.g. Nginx, Apache) and every OS platform (Linux, Mac OS, Windows).
Prerequisites
- Have an Ubuntu 16.04 x64 / 18.01 x64 / 18.10 x64 instance.
- Logged in as a root with sudo privileges.
- You will also need to have Apache2 installed by following these instructions.
To get started with the installation of PHP, follow the steps below:
Step 1: Install Ondřej Surý’s PPA
PHP 7.2 can be installed using Ondřej Surý PPA, so install the software-properties-common package with the following command:
sudo apt-get install software-properties-commonNow add the ondrej PPA and update your sources using the following commands:
sudo add-apt-repository -y ppa:ondrej/php
sudo apt-get update
Step 2: Install PHP 7.2 & PHP Extensions
Install PHP 7.2 on Ubuntu & most commonly used PHP extensions using the following command:
sudo apt-get install php7.2 libapache2-mod-php7.2 php7.2-common php7.2-curl php7.2-mbstring php7.2-xmlrpc php7.2-mysql php7.2-gd php7.2-xml php7.2-intl php7.2-ldap php7.2-imagick php7.2-json php7.2-cliStep 3: Check the PHP installation
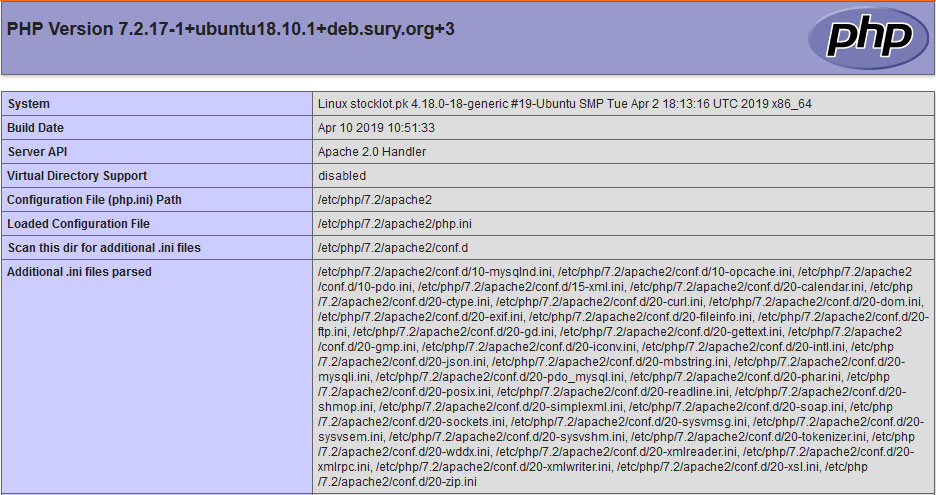
You can use the following command to check the PHP version installed on your server:
php -vYou should receive the following output:
PHP 7.2.17-1+ubuntu18.10.1+deb.sury.org+3 (cli) (built: Apr 10 2019 10:51:33) ( NTS )
Copyright (c) 1997-2018 The PHP Group
Zend Engine v3.2.0, Copyright (c) 1998-2018 Zend Technologies
    with Zend OPcache v7.2.17-1+ubuntu18.10.1+deb.sury.org+3, Copyright (c) 1999-2018, by Zend Technologies
Now, PHP 7.2 has been installed on your Ubuntu server, and if we want to modify the default PHP configuration, open file for Apache2 using the following command:
sudo nano /etc/php/7.2/apache2/php.iniMake the changes on the following below lines in the file and save. The value below is great settings to apply in your environments.
max_execution_time = 180
max_input_time = 360
max_input_vars = 5000
memory_limit = 256M
file_uploads = On
upload_max_filesize = 100M
allow_url_fopen = On
date.timezone = Asia/Karachi
After making the change above, save the file and close out.
Step 4: Restart Apache2
After installing PHP and related modules, all you have to do is restart Apache2 to reload PHP configurations.
To restart Apache2, run the commands below
sudo systemctl restart apache2.serviceTo test PHP 7.2 settings with Apache2, create a phpinfo.php file in Apache2 root directory by running the following command:
sudo nano /var/www/html/phpinfo.phpThen type the content below and save the file.
<?php phpinfo(); ?>Save the file and browse to your server hostname followed by /phpinfo.php. You should see PHP default test page.
The post How to Install PHP 7.2 on Ubuntu 16.04 / 18.04 / 18.10 appeared first on PixelsPress.
]]>The post How to Install MariaDB on Ubuntu appeared first on PixelsPress.
]]>Prerequisites
- Have an Ubuntu 16.04 x64 / 18.04 x64 / 20.04 x64 / 22.04 x64 instance.
- Logged in as a root with sudo privileges.
To get started with the installation of MariaDB, follow the steps below:
Install MariaDB on Ubuntu
To install MariaDB server, run the following commands:
sudo apt update
sudo apt install mariadb-server
After installing MariaDB, you can check the MariaDB status by using the following command:
sudo systemctl status mariadbOutput
mariadb.service - MariaDB database server
   Loaded: loaded (/lib/systemd/system/mariadb.service; enabled; vendor preset: enabled)
   Active: active (running) since Fri 2019-04-19 19:11:25 UTC; 1 day 13h ago
 Main PID: 638 (mysqld)
   Status: "Taking your SQL requests now..."
    Tasks: 28 (limit: 502)
   Memory: 80.3M
   CGroup: /system.slice/mariadb.service
           └─638 /usr/sbin/mysqld
You can check the MariaDB version with the following command:
mariadb -VYou can stop, start and enable the MariaDB when Ubuntu is rebooted with the following commands:
sudo systemctl stop mariadb.service
sudo systemctl start mariadb.service
sudo systemctl enable mariadb.service
Now use mysql_secure_installation to secure the installation of MariaDB server i.e.
sudo mysql_secure_installationThe script will prompt you to determine which actions to perform by answering the following questions.
In order to log into MariaDB to secure it, we'll need the current password for the root user. If you've just installed MariaDB, and you haven't set the root password yet, the password will be blank, so you should just press enter here.

Enter current password for root (enter for none):
OK, successfully used password, moving on...

Setting the root password ensures that nobody can log into the MariaDB root user without the proper authorization.

You already have a root password set, so you can safely answer 'n'.
Change the root password? [Y/n] n
... skipping.

Remove anonymous users? [Y/n] Y
... Success!

Disallow root login remotely? [Y/n] y
... Success!

Remove test database and access to it? [Y/n] y
- Dropping test database...
... Success!
- Removing privileges on test database...
... Success!

Reload privilege tables now? [Y/n] y
... Success!
Cleaning up...

All done! If you've completed all of the above steps, your MariaDB installation should now be secure.

Thanks for using MariaDB!
Now that MariaDB is installed, to verify whether the database server was successfully installed, run the following commands
sudo mysql -u root -ptype the root password when prompted…
Welcome to the MariaDB monitor.  Commands end with ; or \g.
Your MariaDB connection id is 190
Server version: 10.1.29-MariaDB-6ubuntu2 Ubuntu 18.10

Copyright (c) 2000, 2017, Oracle, MariaDB Corporation Ab and others.

Type 'help;' or '\h' for help. Type '\c' to clear the current input statement.

MariaDB [(none)]>
If you see a similar message as shown above, then the MariaDB was successfully installed.
Conclusion
Now you have learned how to Install MariaDB server on Ubuntu and you also know how to connect to the MariaDB server from the command line.
If you have questions feel free to leave a comment below.
The post How to Install MariaDB on Ubuntu appeared first on PixelsPress.
]]>The post How To Set Up Apache2 Virtual Hosts on Ubuntu appeared first on PixelsPress.
]]>Apache2 Virtual Hosts can run more than one website on a single server machine. With Virtual Hosts, you can specify the multiple site document roots, define a separate security policy for each site, use different SSL certificates and much more.
Prerequisites
- Have an Ubuntu 16.04 x64 / 18.04 x64 / 18.10 x64 instance.
- Logged in as a root with sudo privileges.
- You will also need to have Apache2 installed by following these instructions.
To get started with the set up of Apache2 Virtual Hosts, follow the steps below:
Step 1: Setting Up Document Root
The first step that we are going to take is to create a directory structure that will hold the website data and will be serving to visitors. The document root is the directory where the website data for a domain name is stored. You can define the document root to anywhere you want but in this article, we will use the default document root which is /var/www and our directory structure will be
/var/www/
├── yourdomain1.com
│   └── public_html
├── yourdomain2.com
│   └── public_html
├── yourdomain3.com
│   └── public_html
We will create a directory here for the virtual hosts we plan on making. Within each of these directories, we will create a public_html folder that will hold our actual website data. This gives us some flexibility in our hosting.
You can create directories by using the following command:
sudo mkdir -p /var/www/yourdomain1.com/public_html
sudo mkdir -p /var/www/yourdomain2.com/public_html
sudo mkdir -p /var/www/yourdomain3.com/public_html
The -p flag tells mkdir to create any necessary parent directories along the way:
Step 2: Grant Permissions
Since the commands above are executed as a sudo user, the newly created files and directories are owned by the root user.
To avoid any permission issues we can reassign the ownership of the domain document root directory to the apache user (www-data):
sudo chown -R www-data:www-data /var/www/yourdomain1.com/public_html
sudo chmod -R 755 /var/www/yourdomain1.com/public_html
Step 3: Creating Virtual Hosts
On Ubuntu, Apache2 Virtual Hosts configuration files are located in /etc/apache2/sites-available directory. They can be enabled by creating symbolic links to the /etc/apache2/sites-enabled directory, which Apache2 reads during the startup.
Open your editor of choice and create the basic Virtual Host configuration file in /etc/apache2/sites-available/yourdomain1.com.conf with the following code.
<Directory />
    Options FollowSymLinks
    AllowOverride None
    Require all denied
</Directory>
<Directory /var/www/yourdomain1.com/public_html>
    Options -Indexes +FollowSymLinks
    AllowOverride All
</Directory>
<VirtualHost *:80>
    ServerName yourdomain1.com
    ServerAlias www.yourdomain1.com
    ServerAdmin webmaster@yourdomain1.com
    DocumentRoot /var/www/yourdomain1.com/public_html

    ErrorLog ${APACHE_LOG_DIR}/yourdomain1.com-error.log
    CustomLog ${APACHE_LOG_DIR}/yourdomain1.com-access.log combined
</VirtualHost>
To enable the new virtual host file we need to create a symbolic link from the virtual host file to the sites-enabled directory, which is read by apache2 during startup. To enable the virtual host is by using the a2ensite helper i.e.
sudo a2ensite yourdomain1.com
sudo systemctl restart apache2.service
Once done, test the configuration for any syntax errors with:
sudo apachectl configtestIf there are no errors you will see the following output:
Syntax OKNow that you have your virtual hosts configured, you can test your set up by opening any browser and browse to the server domain name. You should see that everything is working correctly.
Conclusion
You should now have the ability to set up an Apache2 Virtual Host configuration to host multiple domains on Ubuntu server. You can repeat the steps we outlined above and create additional virtual hosts for all your domains.
If you are facing any problems, feel free to leave a comment.
The post How To Set Up Apache2 Virtual Hosts on Ubuntu appeared first on PixelsPress.
]]>The post How to Install Apache2 on Ubuntu appeared first on PixelsPress.
]]>Prerequisites
- Have an Ubuntu 16.04 x64 / 18.04 x64 / 18.10 x64 / 20.04 x64 / 22.04 x64 instance.
- Logged in as a root with sudo privileges.
Below are the steps we need to follow to install Apache2:
Install Apache2 on Ubuntu
Before to install Apache2 server, run the following commands first to update Ubuntu:
sudo apt update
sudo apt upgrade
Next, install Apache web server:
sudo apt install apache2That’s it, Apache2 is installed and active. You can check the Apache2 service status by using the following command:
sudo systemctl status apache2● apache2.service - The Apache HTTP Server
Loaded: loaded (/lib/systemd/system/apache2.service; enabled; vendor preset: enabled)
Active: active (running) since Tue 2019-04-16 00:35:04 UTC; 1h 30min ago
Process: 1376 ExecStop=/usr/sbin/apachectl stop (code=exited, status=0/SUCCESS)
Process: 1381 ExecStart=/usr/sbin/apachectl start (code=exited, status=0/SUCCESS)
Main PID: 1396 (apache2)
Tasks: 11 (limit: 502)
Memory: 84.1M
CGroup: /system.slice/apache2.service
├─1396 /usr/sbin/apache2 -k start
├─2159 /usr/sbin/apache2 -k start
├─2160 /usr/sbin/apache2 -k start
├─2161 /usr/sbin/apache2 -k start
├─2162 /usr/sbin/apache2 -k start
├─2163 /usr/sbin/apache2 -k start
├─2164 /usr/sbin/apache2 -k start
├─2165 /usr/sbin/apache2 -k start
├─2166 /usr/sbin/apache2 -k start
├─2167 /usr/sbin/apache2 -k start
└─2198 /usr/sbin/apache2 -k start
Apr 16 00:35:04 yourdomain.com systemd[1]: Starting The Apache HTTP Server...
Apr 16 00:35:04 yourdomain.com systemd[1]: Started The Apache HTTP Server.
The other following commands used to stop, start and enable Apache2 service.
sudo systemctl stop apache2.service
sudo systemctl start apache2.service
sudo systemctl enable apache2.service
Note: Ubuntu 22.04 uses the UFW firewall by default, which stands for “Uncomplicated Firewall.” When the firewall is enabled, it will block all incoming connections. To allow incoming connections on certain ports, you have to configure the UFW firewall.
To open ports for a Apache2 web server, you have to execute the following command:
sudo ufw allow in "Apache Full"Now to check your current firewall configuration settings, please run the following command:
sudo ufw status verboseand the output will be:
Status: active
Logging: on (low)
Default: deny (incoming), allow (outgoing), disabled (routed)
New profiles: skip

To                         Action      From
--                         ------      ----
22                         ALLOW IN    Anywhere
80,443/tcp (Apache Full)   ALLOW IN    Anywhere
22 (v6)                    ALLOW IN    Anywhere (v6)
80,443/tcp (Apache Full (v6)) ALLOW IN    Anywhere (v6)
Verifying the Apache2 Installation
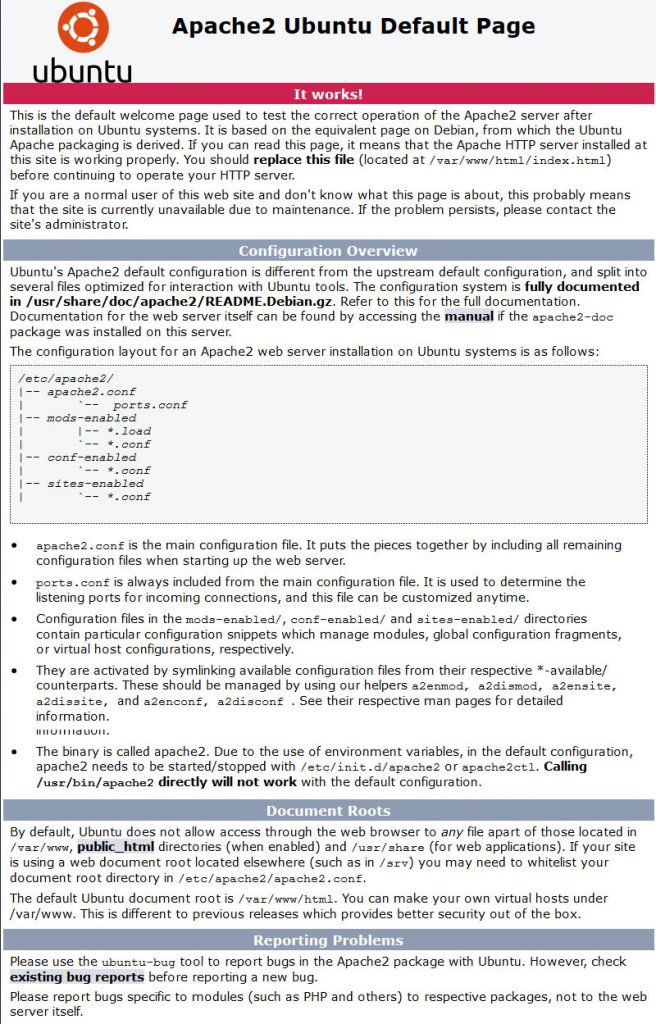
To verify that Apache2 working, open your browser, write your domain name or server IP address i.e. http://YOUR_IP_OR_DOMAIN/and you will see the following default Ubuntu Apache welcome page.
Apache Configuration File’s Structure and Best Practices
- All Apache configuration files are located in the
/etc/apache2directory. apache2.confis the main configuration file. It puts the pieces together by including all remaining configuration files when starting up the web server./etc/apache2/ports.conf.is always included from the main configuration file. It is used to determine the listening ports for incoming connections, and this file can be customized anytime.- Apache Virtual Hosts files are stored in
/etc/apache2/sites-availabledirectory. The configuration files found in this directory are not used by Apache unless they are linked to the/etc/apache2/sites-enableddirectory. - They are activated by symlinking available configuration files from their respective
*-available/counterparts. These should be managed by using our helpers a2enmod, a2dismod, a2ensite, a2dissite, and a2enconf, a2disconf. See their respective man pages for detailed information. - It is a good idea to follow a standard naming convention. For example, if your domain name is
yourdomain.comthen the virtual host configuration file should be named/etc/apache2/sites-available/yourdomain.com.conf - Files containing global configuration fragments are stored in the
/etc/apache2/conf-available/directory. Files in theconf-availabledirectory can be enabled by creating a symlink to the/etc/apache2/conf-enabled/with the a2enconf command and disabled with the a2disconf command. - Apache log files (access.log and error.log) are located in the
/var/log/apache/directory. It is recommended to have different access and error log files for each vhost. - The default Ubuntu document root is
/var/www/html. You can make your own virtual hosts under/var/www.
Conclusion
You have learned how to install Apache2 on Ubuntu server. You can repeat the steps we outlined above and install Apache2 on additional new Ubuntu servers.
If you have a question or facing any problems, feel free to leave a comment.
The post How to Install Apache2 on Ubuntu appeared first on PixelsPress.
]]>